
Disassembly:
- Remove dash trim (horizontal strips of wood grain or silver) with plastic trim removal tools. Pull the trim out as straight towards you as possible – long metal pegs on the trim insert horizontally into the dash.
- If the red clips in the dash break, they can be replaced for about ~$2 each (genuine part). To remove a clip, insert a flat head screwdriver into the middle of the clip (where the trim peg would normally go) and rotate 90 degrees, then pull it straight out. Install the new clip the same way.

- The air vent is a real pain to remove. Two tabs on the bottom side stick out and down, clamping the vent against the front of the dashboard (look at a picture to see them). Pry the vent upwards from the bottom edge. Try to push these tabs up and bend the dash down to get them to clear. The front side of the vent will rotate upwards towards the roof.

- I wasn’t able to remove the cable connected to the vent, so I let it hang down or put it back partway into its original location to keep it out of the way.
- The AC control panel is also difficult to remove. Four metal spring clips hold it in place, two on the top and two on the bottom. Removing the radio and lower trim panel/sunglasses holder should help get better access. Some combination of prying on the left and right sides of the panel with pry tools and pushing it out from behind will release it; it takes quite a bit of force to get it free.
- Removing the main radio harness is fairly simple; pull the horizontal retaining clip on the factory plug straight up and the plug will slide backwards out of the radio.
- Be sure to pull the clip up fully or else the plug won’t release. This is probably not an issue with the factory radio, but if removing an aftermarket radio, there are pegs on the side of the harness adapter that must line up with slots/cut-outs in the clip for the two parts to separate. I had this problem and the solution was to pull up more forcefully on the clip to get it to slide up the rest of the way.

- Factory radio bracket and lower panel (with DSC/heated seat buttons) are each held in with four screws. Lower panel requires the gearshift trim to be removed to access the lower two screws and sunglasses holder removed to reach the upper two screws.
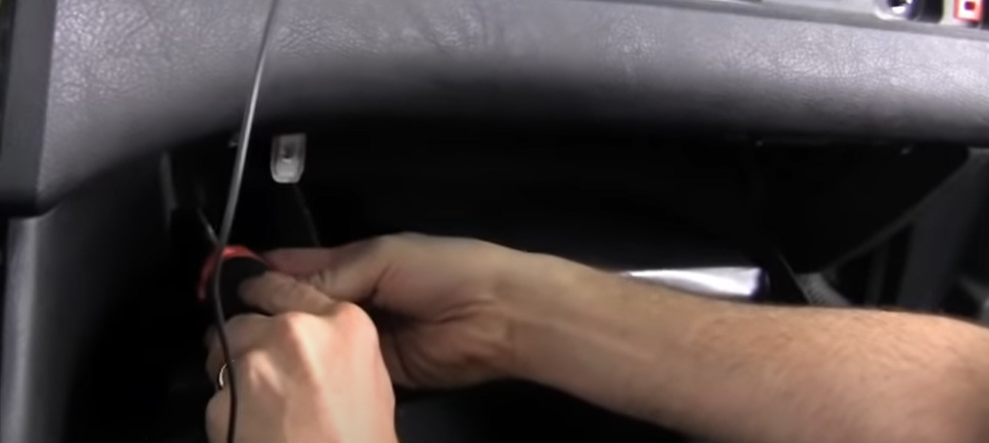
- Remove the glove box and A-pillar trim to run wires for the microphone and GPS antenna.
- Open the glove box, remove three screws from the top edge, two screws on the bottom (see photo), and one close to the passenger door/right side of the footwell. You may have to fiddle with the top edge to release it, but then the glove box should slide out. Unplug and unhook the glove box light and flashlight cables.
- The A-pillar has a long strip in the center covering up the screws; remove this piece with a trim removal tool or a thin metal tool/screwdriver/knife. This piece always cracks and breaks because it’s old and brittle, but it should still clip in and stay in place well enough.
- You will need a very short tool with a T22 (?) Torx bit to remove the three screws, since they are so close to the windshield and there’s very little space.
- The pillar trim is connected at the bottom to the dash. I couldn’t get this piece out, so I laid the trim down on the dash instead of removing it completely.
- The rubber weather strip around the door frame can be removed by grabbing it and pulling straight towards you.
Radio Installation:
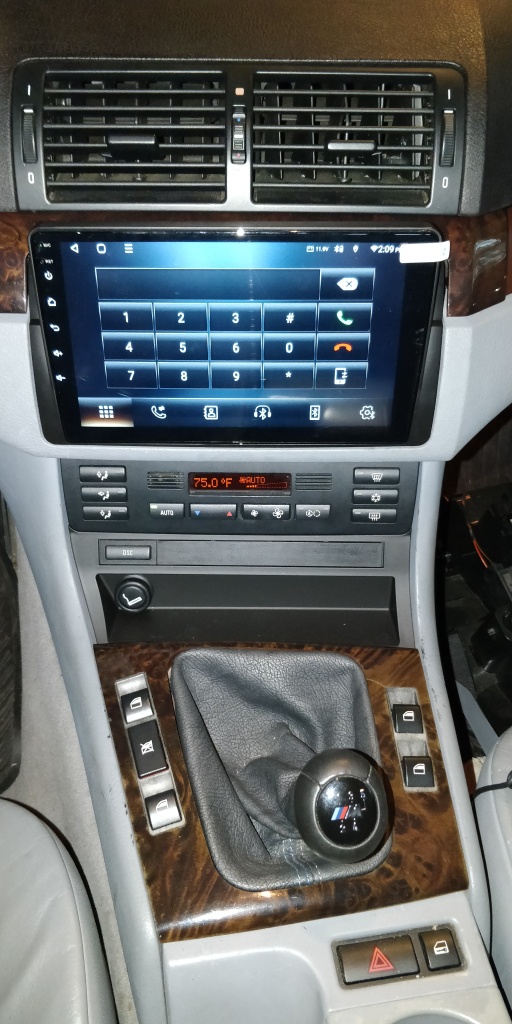
- The eBay description for this head unit says the dash needs to be cut out to allow the unit to be installed, but that’s not necessary. My radio slid into place and is held in with two clips on the bottom and by the dash trim on the top.
- Initially, the radio would stay on and the instrument cluster display would stay lit up even when the key was removed. The fix was to cut the red wire going to the CANBUS module: https://www.youtube.com/watch?v=8vAe7Jughxo (or remove the pin from the connector). No other modifications were required and none of the factory wiring had to be tapped or cut – it’s a simple plug and play operation. Steering wheel controls, dimmer wire, and amplifier turn on worked out of the box.
- The radio antenna adapter was a tight fit onto the factory connector.
- The GPS antenna port has very little space and it’s difficult to tighten by hand, so I used a wrench to make it just tight enough to not come undone.
- I ran the GPS wire through the glove box area and down a channel all the way on the right side of the dash where the wire won’t get pinched.
- The included microphone didn’t fit well anywhere. I’m planning to use the mic from the previous aftermarket radio and get a 2.5mm to 3.5mm adapter (this head unit has a female 3.5mm mic plug).
- There are a lot of wires, but use the black “twisty” cable ties that come with the cables to bundle them together and push everything back into the space between the vents and the air box. It will fit.
HVAC relocation/lower bracket installation:
- I bought the Metra 95-9310B kit. It comes with the double DIN mounting hardware, but you only need the lower trim.
- Use the 95-9311B if your car has the buttons on one single piece and is mounted with screws on the back.
- The DSC button and blank piece should push out from behind. Don’t pry the clips on the blank piece because they’ll break. Super glue re-attached them and the piece still fits well. The 12V power outlet and buttons/blank piece attach securely to the Metra bracket.
- The trim has a tight fit on the sides with the dash material, but I got it into the right spot with a little bit of finagling and then screwed it in.
- Hook the front edge of the gear surround trim under the bracket before screwing in the trim.
- This trim seems like a good quality piece, looks close enough to the original, and the price is very reasonable (under $40).
Head unit usage and settings:
- I had to enable RDS (FM radio station/song info) through the settings > factory section (factory password is 123456).
- The head unit can stay in “sleep” mode for 2 hours, 1 day, or 2 days after the unit powers off. This means it will turn on and be ready to use within a few seconds. Full boot up time is 20-30 seconds if it’s left powered off beyond the sleep time.
- The built-in microphone has very poor sound quality, so it’s practically useless.
- Good performance – The touch screen is responsive and the interface/apps work quickly.
- Radio reception and sound quality are good. There is a LOC/DX button that is supposed to reduce the range and only pick up local stations.

You must be logged in to post a comment.